Period 1
Good morning everyone. Hope all is well today. So the last few days of class we have spent talking about taking portraits and actually taking a few. We are going to pull back a little bit and get back to our merging project. When we left off Thursday you had, or at least were supposed to have, found and saved an image that you are going to put yourself into. The next step in this project is to take a picture and get it onto your Chromebook.
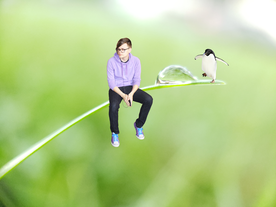
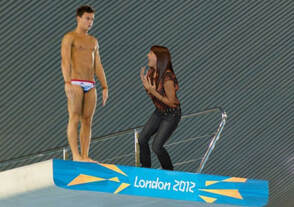
Let's start with getting the picture. Here you will probably need some help from someone at home with you. Most of the pictures that we will need require more of you to be in the shot that is possible from an arms reach. Unless you have a really long selfie stick on Inspector Gadget arms, you won't be able to get yourself from head to toe into the shot. So, show someone at home the photo that you want to go into. They will need to know how much of you needs to be in the shot, what angle you need be shot at and what kind of expression they need to capture from you. Look at the Olympic photo on the bottom right. That photo had to framed from below. The photographer had to lay on the ground to get a good angle. They also needed to be pretty far away from Reilly to fit all of her into the shot. The picture on the left on the other had had to be shot from slightly above Tyler so that it appears to look down on him but also be closer to him so the photographer stood near him on the top of a chair to get the shot to work. Make sure that your photographer understands what you need from them before they start taking pictures. Also, encourage them to take more than one shot! They could try slightly different angles, you could use different expressions... choice is a good thing!
**If you are shooting on an iPhone... Change this setting first so you are shooting in JPEG. Apple's own file type, HEIC, makes good photos, not compatible universally like JPEG is**
Good morning everyone. Hope all is well today. So the last few days of class we have spent talking about taking portraits and actually taking a few. We are going to pull back a little bit and get back to our merging project. When we left off Thursday you had, or at least were supposed to have, found and saved an image that you are going to put yourself into. The next step in this project is to take a picture and get it onto your Chromebook.
Let's start with getting the picture. Here you will probably need some help from someone at home with you. Most of the pictures that we will need require more of you to be in the shot that is possible from an arms reach. Unless you have a really long selfie stick on Inspector Gadget arms, you won't be able to get yourself from head to toe into the shot. So, show someone at home the photo that you want to go into. They will need to know how much of you needs to be in the shot, what angle you need be shot at and what kind of expression they need to capture from you. Look at the Olympic photo on the bottom right. That photo had to framed from below. The photographer had to lay on the ground to get a good angle. They also needed to be pretty far away from Reilly to fit all of her into the shot. The picture on the left on the other had had to be shot from slightly above Tyler so that it appears to look down on him but also be closer to him so the photographer stood near him on the top of a chair to get the shot to work. Make sure that your photographer understands what you need from them before they start taking pictures. Also, encourage them to take more than one shot! They could try slightly different angles, you could use different expressions... choice is a good thing!
**If you are shooting on an iPhone... Change this setting first so you are shooting in JPEG. Apple's own file type, HEIC, makes good photos, not compatible universally like JPEG is**
 |  |
Once your photos are taken, the next step is to get them from your camera to Chromebook. If you're using an actual camera (not a phone) just take the card out and put it in Chromebook if it has a card reader on the side of it (I don't believe that all of our school Chromebooks do). If you're using a smart phone, do not email the photo to yourself! This will compress the photo! Essentially, the image goes from high resolution to a lower resolution so that it uses less storage space and opens more quickly. Convenient, yes. Great for quality, no! Instead, since we all have Google account for school (and these accounts have free and unlimited storage space) we will upload your pics to Google Drive. If you aren't sure how to do this and you use an iPhone, watch this video. Like wise, this video will explain how to do it if you are using Android. Once it's in Google Drive we can easily access it on your Chromebook. That's it for today. Hit me with an email if you hit a snag and need help! Have a great day everyone!
Period 4
Hello all you awesome photographers! Hope you're having a great Tuesday. We have spent some time taking photos and now hopefully you have some or even all of your photos. Remember... to get them from your phone to you Chromebook, do not email them to yourself! This compresses them and looses quality. If you are shooting on an iPhone hopefully you still have the option set from the last class so that you are not capturing HEIC files. If you are, watch this video and do both parts that it suggests. Then you can transfer the photos from your phone using Google Drive. If you need a refresher and are using an iPhone, watch this video. Android users, congrats on choosing the right team! Watch this video.
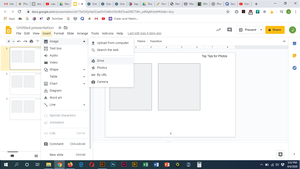
Once the videos are on Google Drive, they will be easy to access on your Chromebook and easy to add to your Slides file. You can simply go to Insert>Image>Drive and choose the image. It's pretty easy from there. This video will walk you through the details if you need any extra instruction. As always, don't hesitate to email me if you have any questions or concerns!
Period 5
Hello there guys, hope all is well this Tuesday afternoon. Yesterday I talked about raster graphics and had you do a Quizlet to review some of those concepts. The key takeaways for rasters are that they come from cameras and scanners, are made of pixels but look real. If you change their size, they get blurry or pixelated. Today we are going to contrast rasters with vectors, the other type of digital graphic. This video will explain them to you in detail. Just like yesterday, I'd like you to do a quizlet to study the vector terms. Just like yesterday, once you've reviewed and done well with it, take a screen shot and upload it to Schoology. That's all for today! Hope you have a great day!
Period 4
Hello all you awesome photographers! Hope you're having a great Tuesday. We have spent some time taking photos and now hopefully you have some or even all of your photos. Remember... to get them from your phone to you Chromebook, do not email them to yourself! This compresses them and looses quality. If you are shooting on an iPhone hopefully you still have the option set from the last class so that you are not capturing HEIC files. If you are, watch this video and do both parts that it suggests. Then you can transfer the photos from your phone using Google Drive. If you need a refresher and are using an iPhone, watch this video. Android users, congrats on choosing the right team! Watch this video.
Once the videos are on Google Drive, they will be easy to access on your Chromebook and easy to add to your Slides file. You can simply go to Insert>Image>Drive and choose the image. It's pretty easy from there. This video will walk you through the details if you need any extra instruction. As always, don't hesitate to email me if you have any questions or concerns!
Period 5
Hello there guys, hope all is well this Tuesday afternoon. Yesterday I talked about raster graphics and had you do a Quizlet to review some of those concepts. The key takeaways for rasters are that they come from cameras and scanners, are made of pixels but look real. If you change their size, they get blurry or pixelated. Today we are going to contrast rasters with vectors, the other type of digital graphic. This video will explain them to you in detail. Just like yesterday, I'd like you to do a quizlet to study the vector terms. Just like yesterday, once you've reviewed and done well with it, take a screen shot and upload it to Schoology. That's all for today! Hope you have a great day!
 RSS Feed
