Period 1
Hello everyone. Today we will start the hardest project in the class. Here's the thing though... this project really isn't tough, it just requires you to pay very close attention to to the details. Honestly, I've had students start and complete this project in just one class period. However, if you don't pay close attention to the little things, it will not work for you and will frustrate the heck out of you so please, pay close attention to the video and handout!
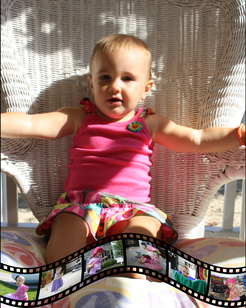
Hopefully you have chosen your 6 photos for the strip and one different photo for the background. If you did, the next step is to choose which six will be in the strip. These photos will all need to be the same orientation (all landscape or all portrait) and the same aspect ratio for this to look right. If the photos you have chosen are not the same... no worries! Use the crop tool from yesterday to crop them all the same way. If it were me, I would crop each of them to be 3:4 or 2:3 depending on what they are currently set at. This is all explained in the first video on the link below. Once they are all the same you can build the strip using Bridge. This is explained on the handout and on the videos linked there too. Just take your time, focus on the details and you'll be fine!
What are we learning today?
1. Cropping the Strip Photos to the same Aspect Ratio (first video)
2. Film Strip Collage Construction (Second and third video)
3. Objectives to Accomplish Today:
Vignette
- Open a portrait
- Follow the steps to add a vignette around the photo
- Upload the before and after to schoology
Antiqued Photo
- Download the frame & add the photo to it
- Add a glass overlay on top of the portrait
- Create a wallpaper
- Add the portrait to the wallpaper
- Apply a drop shadow to the frame
- Make a vignette to emulate a spotlight on the picture
- Save as a PNG & PSD, turn in PNG
Film Strip Collage
- Choose 6 photos for the film stip, one for the background photo
- Crop each of the strip photo so they are are all the same aspect ratio
- Crop the background photo to 8 x 10
- Build the photo strip in Bridge
- Add the strip to the background photo
- Create the film
- Make the film wave
- Save as a PNG & PSD
- Upload the PNG to Schoology
4. Cleanup
5. Review/What’s Next
Periods 4 & 5
Good afternoon all. Hope your having a great day. Yesterday we started the the personifying a word project. Today I have two new steps for you. In fact if you complete these two, the project is done already. I don't want you to rush though. I'd rather you take your time and do a nice job than rush and do a half butt job on it! Today I would like you to develop your thumbnails into a rough. The goal with the rough is to lock down the idea so that it's easier to make in Illustrator. With the rough done, feel free to hop onto Illustrator and create the real thing. That's really it for today. Good luck and have fun with it!
What are we learning today?
1. Personifying Rough
2. Personifying Vector
3. Objectives to Accomplish Today:
Notepad
- Choose a theme for your notepad
- Grab a sheet of paper & fold in half twice
- Draw a design in each square using the same theme
- Choose the best design & make a rough
- Vector the image in it’s own Ai file
- Layout a comprehensive using the rough template from Ai
- Make a 4-Up
- Print a proof sheet
- Choose 25 sheets of paper
- Place the paper in tray 1 of printer, tell others NOT to print
- Send the job to the 419-C1 printer
- Collect & jog prints
- Put prints apart
- Cut cardboard (mat board) for backing
- Make a mount for one print
- Pad the notepad
- Trim the edges
- Tuck thumbnails, rough, comp, mount & rubric into pad
- Turn in to bin
Type
- Obtain and label four sheets of paper
- 5 Roman, 5 Square (page 1)
- 10 Sans Serif (page 2)
- 10 Script (page 3)
- 1 Text, 9 Novelty (page 4)
- Cut out examples and glue them into the correct section
- Print cover page
- Staple all pages together
- Turn in Search to bin
4. Cleanup
5. Review/What’s Next
Hello everyone. Today we will start the hardest project in the class. Here's the thing though... this project really isn't tough, it just requires you to pay very close attention to to the details. Honestly, I've had students start and complete this project in just one class period. However, if you don't pay close attention to the little things, it will not work for you and will frustrate the heck out of you so please, pay close attention to the video and handout!
Hopefully you have chosen your 6 photos for the strip and one different photo for the background. If you did, the next step is to choose which six will be in the strip. These photos will all need to be the same orientation (all landscape or all portrait) and the same aspect ratio for this to look right. If the photos you have chosen are not the same... no worries! Use the crop tool from yesterday to crop them all the same way. If it were me, I would crop each of them to be 3:4 or 2:3 depending on what they are currently set at. This is all explained in the first video on the link below. Once they are all the same you can build the strip using Bridge. This is explained on the handout and on the videos linked there too. Just take your time, focus on the details and you'll be fine!
What are we learning today?
1. Cropping the Strip Photos to the same Aspect Ratio (first video)
2. Film Strip Collage Construction (Second and third video)
3. Objectives to Accomplish Today:
Vignette
- Open a portrait
- Follow the steps to add a vignette around the photo
- Upload the before and after to schoology
Antiqued Photo
- Download the frame & add the photo to it
- Add a glass overlay on top of the portrait
- Create a wallpaper
- Add the portrait to the wallpaper
- Apply a drop shadow to the frame
- Make a vignette to emulate a spotlight on the picture
- Save as a PNG & PSD, turn in PNG
Film Strip Collage
- Choose 6 photos for the film stip, one for the background photo
- Crop each of the strip photo so they are are all the same aspect ratio
- Crop the background photo to 8 x 10
- Build the photo strip in Bridge
- Add the strip to the background photo
- Create the film
- Make the film wave
- Save as a PNG & PSD
- Upload the PNG to Schoology
4. Cleanup
5. Review/What’s Next
Periods 4 & 5
Good afternoon all. Hope your having a great day. Yesterday we started the the personifying a word project. Today I have two new steps for you. In fact if you complete these two, the project is done already. I don't want you to rush though. I'd rather you take your time and do a nice job than rush and do a half butt job on it! Today I would like you to develop your thumbnails into a rough. The goal with the rough is to lock down the idea so that it's easier to make in Illustrator. With the rough done, feel free to hop onto Illustrator and create the real thing. That's really it for today. Good luck and have fun with it!
What are we learning today?
1. Personifying Rough
2. Personifying Vector
3. Objectives to Accomplish Today:
Notepad
- Choose a theme for your notepad
- Grab a sheet of paper & fold in half twice
- Draw a design in each square using the same theme
- Choose the best design & make a rough
- Vector the image in it’s own Ai file
- Layout a comprehensive using the rough template from Ai
- Make a 4-Up
- Print a proof sheet
- Choose 25 sheets of paper
- Place the paper in tray 1 of printer, tell others NOT to print
- Send the job to the 419-C1 printer
- Collect & jog prints
- Put prints apart
- Cut cardboard (mat board) for backing
- Make a mount for one print
- Pad the notepad
- Trim the edges
- Tuck thumbnails, rough, comp, mount & rubric into pad
- Turn in to bin
Type
- Obtain and label four sheets of paper
- 5 Roman, 5 Square (page 1)
- 10 Sans Serif (page 2)
- 10 Script (page 3)
- 1 Text, 9 Novelty (page 4)
- Cut out examples and glue them into the correct section
- Print cover page
- Staple all pages together
- Turn in Search to bin
4. Cleanup
5. Review/What’s Next
 RSS Feed
