WELCOME TO...
  • Home
  • Daily Blog
  • Grades
  • Contact
  • About Mr. Tate

Thursday, April 16th

4/16/2020

0 Comments

 
​Period 1
Good morning everyone. It's the 16th... we're half way through April already! I say already but I feel like March was an entire year ago already! Anyway, in the would of digital photography we are now finished our merging project. Now it's time to move on. Although it's much less exciting than the project that we just did, I would like to talk about buying a camera. I have a video here that I made of the lesson and I'd like you to watch it. You're on the honor code, meaning I'm not giving you an assignment to do afterward. I'm trusting you to do the right thing here and watch the video. That's all that is new for today. I do want to remind you though that since it's Thursday, that means that tomorrow is Friday (real captain obvious there huh) and your 10 texture photos are due. If you have yet to take them, you might want to do that today! That's all that I have for you. Hope it's a great day!


Period 4
Hi there everyone. Hope your Thursday is going well. At this point your tips book is hopefully complete. If not, you can finish it today and then use Screencast-o-matic with it. Yesterday I had asked you to install it on your Chromebook. Hopefully you didn't have any trouble getting the app. I use Screencast-o-Matic to make my demo videos and record my PowerPoint lessons all the time. It's really easy to use. This video was produced by the company and walks you really quickly threw the basics. So what do I want you to do with Screencast-o-Matic? I want you to present your tips book as if you were giving a lesson to a bunch of beginning photographers. Use your book to guide you, but don't just read it directly to them. Explain in more detail what it is you are trying to teach them, why you're such a believer in it and explain the example photos. There is no required length for this. Just think of the lessons that you get from me or your other teachers and go to it. Once your done simply end the recording, save the file and upload it to the Tips Book Presentation on Schoology. That's all for today. Make it another great day guys!


Period 5
Good afternoon everyone. Hope all is well and that you're having a good day. Yesterday I shared two videos with you to help you create your own version of a dog made just with shapes. Today I have a short lesson for you. All we are going to do today is color the dog. The colors should match the original to get the most possible points. You already know that, but I'll explain it again in this video. I'll also review how to change the order of items in case something is blocked by another item. After you watch the video and complete the dog you can turn it in on Schoology. That's all I have for today. Enjoy the rest of your day and stay safe!
0 Comments

Wednesday, April 15th

4/15/2020

0 Comments

 
Picture
Period 1
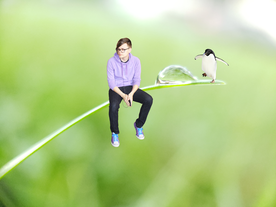
Good morning everyone. Yesterday was all about color temperature. You learned what it is, how it effects colors' appearance and even how to adjust it. This isn't necessarily an easy thing to do but hopefully you've made the most of it and made it look pretty close to the lighting present in the original photo. Today is the big payoff... we'll put it all together! All the steps that we've gone through in the last few weeks have brought us here to this point. I'll show you how to put them together and rescale things so that you're at an adequate proportion in the web image. This video will walk you through everything, Once it's done save it as a PNG file and turn it in on Schoology. If it's a PNG you can also upload it to Drive and share, down load it to your phone, etc. That's it for today. You should be feeling pretty good about yourself though... your first project is done! 


Period 4
Hello photographers, hope your having a good day. Remember that today is the last day to work on the tips book. While you work to add the finishing touches to the project, I would like you to the Web Store and install Screencast-O-Matic. If it isn't available to you guys, please let me know so that I can try to have it unblocked for tomorrow. Hope you all have a great Wednesday!


Period 5
Hi everyone. Hope all is well today. The last few days we have been working on drawing vector graphics with the pen tool. This is how some images have to be made since they have such crazy bends and contours to them. Not all images are made that way though. Some can be built entirely with shapes. That's what we are going to start today. I have a lame looking dog on Schoology. In fact you can see a version of him on the right. We are going to draw him using only shapes. It's an easy project, but really tough to do perfectly! This video will walk through the process of finding the image and starting to draw it. I broke the less into a second video so you could take a little break and step away from it if you need to. You can find the second part here. Tomorrow we will add color to finish it up, so even if you do both of these parts today, please don't turn it in yet! Have a great day!

0 Comments

Tuesday, April 14th

4/14/2020

0 Comments

 
Picture
Period 1
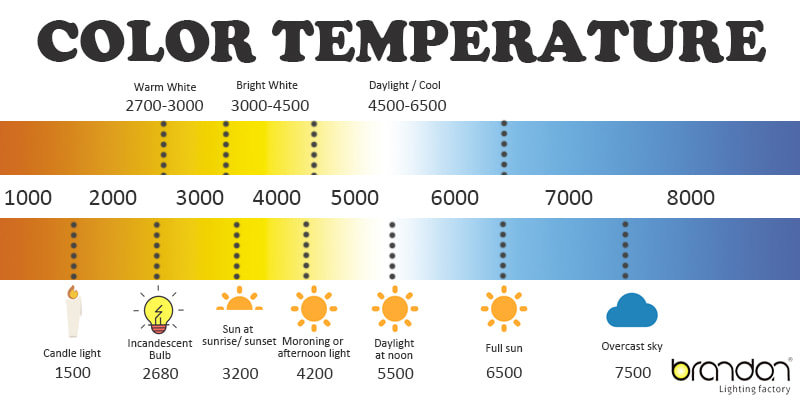
Good morning, hope things are going well for you so far today. Yesterday you made a cutout of yourself on a transparent background. Today is going to be a much easier day. We are going to adjust the color temperature of the cutout so that it matches, or at least closely resembles the color temperature of the original image you found on Google. You're probably reading my words and thinking all this social distancing has caused me to loose my mind! Color Temperature?! Well, it's a thing actually! If you ever go to Lowe's and look at light bulbs you'll see a display showing how each light shines differently. Old school, incandescent light bubs have a warm, red leaning color temperature. Fluorescent lights like we have in school are more blue to even a slight green cast. What color do you think mid day sun shines? You're probably thinking yellow, orange or red. If so, you'd be wrong, it shines blue! Take a look at this chart.


You can see that the sun isn't always blue. In fact, movies are often shot in late afternoon and early morning to get that 3200-4200 kelvin sunlight. They take a really long lunch break to avoid the overly blue color of full sun because it just doesn't look great with all of that blue. Getting back to the light bulb front, this video describes how the color of light bulbs impacts us. 

Soooo, we want to make the color of light in each photo, the one you found on the web and the one that you had shot of you match. We'll have to use Pixlr for this. Open up each photo in Pixlr and then watch this video. It will explain how you can adjust the color temperature to make it match. Once you've matched the colors to the best of your ability, save the photo and your done for the day. As always, hit me up on email if you have any questions!


Period 4


Period 5

Good afternoon everyone. Hope all is well and that you're having a good day. Yesterday I showed you how to vector the Penn State logo. It's tough learning how to pull those lines to get them to bend the way you want them to. Please hang in there with it! It may come easy to you or it may take some practice. Just take your time, don't get overwhelmed and do the best that you can. Today I am not giving you any new work. I am giving you more time to complete that practice vector, the Penn State logo. Once it's done and colored, you can turn it in on Schoology. Tomorrow we will move on into new territory with Gravit. Hope you have a great day, and as always, don't hesitate to reach out if you need some help!

0 Comments

Monday, April 13th

4/13/2020

0 Comments

 
Period 1
Good morning. Hope you enjoyed that long holiday weekend. It was a little shorter than usual, and as with everything else in this current world, quite different, but it was still nice to have a little bit of normalcy. So here we are at the start of week 3. To end last week we learned to make a selection, take that selection and turn it in to a cutout. On Thursday we talked about textures and that is this weeks photo assignment due on Friday. So getting in to this week, we are going to make a cutout of the photo of you. Open Pixlr and the photo of you. Make a legit selection with any of the tools that we used last week for the practice selection. Zoom in on the edges and make sure that the selection is a perfect as possible. The better the selection, the more realistic the project will be. After you've made a great selection, cut it out, make a new document with a transparent background and paste the selection into it. When you go to save it, don't forget to make it a PNG so that it stays transparent. If you forget any of this process, go back to last weeks post and re-watch the video. As always, let me know if you have any questions! Have a great day guys!


Period 4
Hello camera geeks. Hope you had a great QuarentEaster. It's was nice to have a holiday, something to make you forget all that's going on even though it was nothing like a normal Easter break! SO we have been working on your tips book for a little while. How's it going? Are we getting close to completing it? I want to give you plenty of time, but at the same time I don't want to drag this out to long. So today I would like you to let me know how it's going. On Schoology you'll find an assignment title Tips Book Progress. I just want you to give me an update on your status to help me set a due date. I'll even give you 5 easy points for it. This assignment is all that i need from you today. Have a good one!


Period 5
Hi there. Hope you enjoyed the three day weekend. Here we are entering week three. To end last week we setup Gravit. Some of you had a problem creating an account with your school email account. If it doesn't work, you can create an account with your personal email. Now that everyone is up and running, and hopefully has watched the tutorial explaining the software, we are going to use the software to create vector graphics. We are going to draw the Penn State logo. This video will walk you through finding the logo. Once the logo is saved you can setup a new document and vector the the first shape by following this video. You'll probably want to watch a little bit, pause it, do what I show you and then watch some more. This video will show you how to vector the second shape... the most challenging part of the image. To complete the project, watch and do what it shows you in the fourth and final video on the project. It's not easy, it'll take you some time to perfect the process and make your lines effective so this assignment isn't due until tomorrow. Just pay close attention to where I make my points, drag my lines and things should be a little easier for you. As always, let me know if there is anything that I can do to help!
0 Comments

Thursday, April 9th

4/9/2020

0 Comments

 
Period 1
Good morning. Hope you've had a great week as we wrap up the last day of it. Since the end of the week is approaching, don't forget that your portraits are due tomorrow. Obviously you can turn them in today if their done! There is a portrait assignment in the white Weekly Photos Assignment folder on Schoology. Just upload all 10 there. For next Friday, I would like you to take 10 pictures using texture. I have two resources for you to check out. This one explains how lighting effects textures. The second one gives you some tips for using textures in your shots. I chose this one for this week as it's something that is easy to do even if you aren't leaving the house! They won't be due until next Friday so you have plenty of time. That's all for today. Have a great day and an even better weekend everyone!


Period 4
Hi there guys, hope all is well. I haven't been hearing much from you so I'm assuming that all is well and the tips book is coming along pretty well. Today is another day to simply work on that book. Hope you all have a great day and a fantastic week!


Period 5
Hello there everyone. since we had so many problems and a bit of a late start yesterday getting everything to work, I'm going to give you today to complete yesterday's task of installing Gravit (which you should now be able to access through the NEBobcats section now to install it. It was working for a few people yesterday so I'm hoping it's good for everyone now! Once you have the app installed, watch the video I posted yesterday and play around a little to get familiar with the program. On Monday we will jump into to Gravit and start to make a vector graphic so the more comfortable you are now, the easier it will be on Monday. Hope you have a great day and a fantastic weekend!
0 Comments

Wednesday, April 8th

4/8/2020

0 Comments

 
Period 1
Hey, happy Wednesday! And since we don't have class on Friday, it's kind of like a Thursday! Hope all is well today. Today we will install and use a new software, Pixlr. It is a web based photo editor that can also be installed as an app on your Chromebook. It's not as advanced as Photoshop, but it's free and runs on a Chromebook soooo, yay Pixlr! This video will walk you the process of getting the software on your Chromebook and setting up an account. Once that's setup, you're good to use it as a photo editor, but we need something to edit. We will have to be able to make a selection of you from the photo that someone took for you and was then uploaded to Drive. There are quite a few ways to make a selection, but making a good selection requires practice. So instead of just diving right in to that photo of you and potentially butchering it, we'll start by making a practice selection. This video will explain finding an image. Keep in mind that while you can use this image in the final process, you don't have to use it. Although it is for practice, I would like you to turn it in for credit. This lesson is in two different parts. There are several different tools and I'd like you to experiment with each of them to see what works best for you. This video will walk you through the wand and the lasso tool. After trying these, this video will walk you through the process using the magnetic and polygonal lassos. Take your time, try to make it a legit selection. While it's just practice, practice making it as perfect as you can so that when you do your real image, you'll have honed your skills finely.  Once it's complete, you can upload it on Schoology. As always, please let me know if you need some help!


Period 4
Hello everyone. Hope you're all safe and well. I have nothing new for you today. I would like you to simply continue to work on your tips book today. If you have any questions or concerns, please let me know! I'm here to help you anytime! Just know that I am not in my email every minute of the day so while I'll get back to you as soon as I can, it might not be instantly! Have a great Wednesday!


Period 5
Good afternoon class. Hope you're having a good day today. We are over half way to the weekend already since we don't have class Friday for Easter break. Just like everything else right now, it's going to be an odd Easter break not being able to go anywhere. Oh well, we'll do what we have to do to get through this, right?! Anyway, since you now know about raster images and vector images, we are going to actually start to create a vector graphic. To do this we would usually use Adobe Illustrator. This is the industry standard for graphic design, but it doesn't run on Chromebooks. Sooooo, instead we will use Gravit. It's a free vector software that has a lot of the functionality that Illustrator has and it runs through web browsers or can be installed as a Chromebook app. That's how we will use it, by installing it on your Chromebook. I have made a video on how to do this. In the video I walk through the process of installation and setting up an account. After you have everything set up. Check out this video on the basics of the software. It is a bit long, but it will help you to have a little familiarity with the software before we start to create your own vector. That's it for today. As always, don't hesitate to reach out to me through email if you need some help! Hope you have a good day!
0 Comments

Tuesday, April 7th

4/7/2020

0 Comments

 
 Period 1
Good morning everyone. Hope all is well today. So the last few days of class we have spent talking about taking portraits and actually taking a few. We are going to pull back a little bit and get back to our merging project. When we left off Thursday you had, or at least were supposed to have, found and saved an image that you are going to put yourself into. The next step in this project is to take a picture and get it onto your Chromebook.

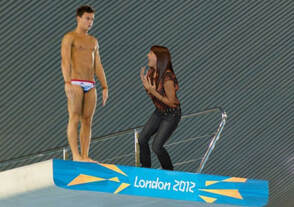
Let's start with getting the picture. Here you will probably need some help from someone at home with you. Most of the pictures that we will need require more of you to be in the shot that is possible from an arms reach. Unless you have a really long selfie stick on Inspector Gadget arms, you won't be able to get yourself from head to toe into the shot. So, show someone at home the photo that you want to go into. They will need to know how much of you needs to be in the shot, what angle you need be shot at and what kind of expression they need to capture from you. Look at the Olympic photo on the bottom right. That photo had to framed from below. The photographer had to lay on the ground to get a good angle. They also needed to be pretty far away from Reilly to fit all of her into the shot. The picture on the left on the other had had to be shot from slightly above Tyler so that it appears to look down on him but also be closer to him so the photographer stood near him on the top of a chair to get the shot to work. Make sure that your photographer understands what you need from them before they start taking pictures. Also, encourage them to take more than one shot! They could try slightly different angles, you could use different expressions... choice is a good thing!

**If you are shooting on an iPhone... Change this setting first so you are shooting in JPEG. Apple's own file type, HEIC, makes good photos, not compatible universally like JPEG is**

Picture
Picture
Picture
Once your photos are taken, the next step is to get them from your camera to Chromebook. If you're using an actual camera (not a phone) just take the card out and put it in Chromebook if it has a card reader on the side of it (I don't believe that all of our school Chromebooks do). If you're using a smart phone, do not email the photo to yourself! This will compress the photo! Essentially, the image goes from high resolution to a lower resolution so that it uses less storage space and opens more quickly. Convenient, yes. Great for quality, no! Instead, since we all have Google account for school (and these accounts have free and unlimited storage space) we will upload your pics to Google Drive. If you aren't sure how to do this and you use an iPhone, watch this video. Like wise, this video will explain how to do it if you are using Android. Once it's in Google Drive we can easily access it on your Chromebook. That's it for today. Hit me with an email if you hit a snag and need help! Have a great day everyone!


Period 4
Hello all you awesome photographers! Hope you're having a great Tuesday. We have spent some time taking photos and now hopefully you have some or even all of your photos. Remember... to get them from your phone to you Chromebook, do not email them to yourself! This compresses them and looses quality. If you are shooting on an iPhone hopefully you still have the option set from the last class so that you are not capturing HEIC files. If you are, watch this video and do both parts that it suggests. Then you can transfer the photos from your phone using Google Drive. If you need a refresher and are using an iPhone, watch this video. Android users, congrats on choosing the right team! Watch this video.

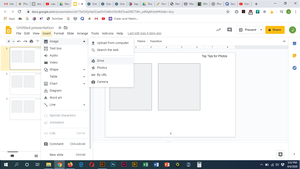
Once the videos are on Google Drive, they will be easy to access on your Chromebook and easy to add to your Slides file. You can simply go to Insert>Image>Drive and choose the image. It's pretty easy from there. This video will walk you through the details if you need any extra instruction. As always, don't hesitate to email me if you have any questions or concerns!


Period 5
Hello there guys, hope all is well this Tuesday afternoon. Yesterday I talked about raster graphics and had you do a Quizlet to review some of those concepts. The key takeaways for rasters are that they come from cameras and scanners, are made of pixels but look real. If you change their size, they get blurry or pixelated. Today we are going to contrast rasters with vectors, the other type of digital graphic. This video will explain them to you in detail. Just like yesterday, I'd like you to do a quizlet to study the vector terms. Just like yesterday, once you've reviewed and done well with it, take a screen shot and upload it to Schoology. That's all for today! Hope you have a great day!

0 Comments

Monday, April 6th

4/6/2020

0 Comments

 
Period 1
Good morning! Hope you had a fantastic weekend and were able to get outside a little bit yesterday. Today, instead of working on more lessons and assignments online today, I'm giving you today off from the computer. Get outside and take some pictures! Remember to use some of the tips from the portraits lesson from last week. You only need 10 portraits. They can all be of the same person, all different people, a self or two (but no more) and maybe 2 of pets if you would like. I'm not trying to be difficult but selfies are tough because you can only get an arms length away. We are going to do some touch ups on these pictures and it's hard to touch up skin on a dog that has fur all over their skin! Anyway, go take some pictures. They are not due until Friday, but it never hurts to get a jump on them. Have a great day and don't hesitate to email me with questions!


Period 4
Hello there photographers! Hope you had a good weekend and are ready for week number two of online school. It may not be ideal, but I feel like we're doing ok with it. I having a feeling this is going to last for more than just this month unfortunately. As we keep hearing all the time lately, we'll just have to wait and see how this thing plays out! Anyway, since it's going to be another really nice day again today, step away from your keyboard for class and go get those tips book pictures! Remember, the projects requires a with and without photo for each of your tips. If you have any questions, shoot me an email! Have a great day guys!


Period 5
Hi there everyone. Hope you had a great weekend and that the second week of cyber school is off to a great start. On Friday we talked about some vocabulary in preparation of talking about raster graphics. Today we are going to keep moving forward with that lesson and focus on Rasters. This video will describe raster graphics. Please watch it. Once you are done with the video I have a Quizlet. If this were a face to face we would do a Quizlet live to review. Since we aren't together, I want you to go to the Quizlet and play a game of your your choice. Just to keep you honest, please take a screen shot of your completed review and upload it to Rasters Review on Schoology. To get credit for it your score must be above a 70%. Since we are aiming to get a score, flash cards won't do it but I think the rest will give you a score. If you get above a 70% you will earn full credit for the assignment. Less than 70% will not receive credit, so keep trying if you need to! That's all for today, email me with any questions!
0 Comments

Friday, April 3rd

4/3/2020

0 Comments

 
  Period 1
Happy Friday everyone! Hope today is a good day for everyone and that you've managed the first week of cyber school relatively well. Today I plan to give you more time to work on selecting and saving that perfect image for you to use for your merging project. Instead of moving onward with that project, I wanted to take today to talk about your first picture taking assignment. Each week of the class, typically on Friday, I will assign a new picture taking assignment. Each week there will be a required topic or style of shooting that I would like you to shoot. You'll have one week to take what is usually 10 pictures. This week, I want you to create portraits. What are portraits? They are pictures of people that showcase their personality. I have created a video that explains portraits and provides tips on how to make them more interesting. It was developed from this site so if you prefer to read, you can take a look at the link (and the link for 10 more tips at the bottom of the page too.

Using those suggestions and any digital camera that you have available to you I would like you to shoot 10 portraits of people. They can all be the same person, 10 different people, even a few (maybe 3 at the most) of a pet. One or two can be selfies if you'd like, but no more than that. There is only so much you can do from an arms length! I know that the amount of subjects right now is more limited than usual because we are practicing social distancing. We are allowed to leave the house for walks, so taking the camera for a walk is acceptable. It's supposed to be beautiful this weekend from what I'm hearing too! Please don't do this if you do not feel comfortable going out! If you do leave the house for pictures, just remember to distance yourself from others... I believe 6 feet at least is the recommendation. I know this is a trying time, and I'm flexible! Between family, a few selfies, pets, and having a whole week you should be able to get 10 pictures. Smart phone, digital camera, tablet camera, even Chromebook camera if you have to are acceptable. Just take 10 pictures trying to use some of those techniques from the video or link that I provided. Don't stress out over this! Just have fun with your camera and take some interesting photos! Have a great weekend everyone! As always, take care, stay safe, and email me with any concerns or questions!

What are we learning today?
1.  Review Resolution, Pixels
2.  PPT: Portraits
3.  Weeks Photo Assignment
4.  Objectives to accomplish today:  
   Checking in
     - Please answer the checking in question
   Getting to Know You Video
     - Watch the How to video
     - Jot down a few notes on what you would like to say
     - Launch your camera and record your video
     - Video should answer:
          - Who you are, grade
          - Something you like to watch, listen to, read or play
          - Someone famous that you would like to be and why
          - One thing that your proud of yourself for achieving
     - The video should be at least a minute long
     - Don’t worry if someone walks into the shot, noise in background etc
     - Just be you!
     - Save the video and upload it to Schoology
     - View the videos of your classmates
     - Reply to at least 5 of your classmates
   Image Merging
     - Come up with an idea for your project
     - Find an appropriate image on Google
          - The higher the resolution the better
          - Make sure there is adequate space for you to occupy
          - The image must be school apprpriate!
     - Download the image so that you have it to use later.
   Portraits
     - Watch the video on effective portraits
     - Shoot at least 10 portraits (same person, all different, doesn’t matter)
5.  Review/what’s next


Period 4
​
Hello there photographers! We've almost survived our first week of cyber school! I hope it hasn't been too awful for you so far. I would much rather be in school with all of you, but we're doing what we have to right? Anyway, by now you hopefully have a template for your tips book completed. What you can start to do now is take your pictures. You should have a with/without or before/after photo for each tip. That means that you should have at least 16 photos... more if you want to put a photo on the cover. We are able to leave the house for walks and it's supposed to be relatively nice this weekend so it you are comfortable with leaving the house... only if you're comfortable with it, maybe take the camera for a walk. Of course this can be done in the house too! Please, whatever you decide to do, take care, be safe, and if you go out, practice social distancing. Let me know if you have any questions or concerns. Have a great weekend guys!

What are we learning today?
1.  Review Tips Book Project
2.  Discuss Taking Pictures for the Book
3.  Objectives to accomplish today:
   Checking in
     - Please answer the checking in question
   Composition Assignment
     - Research composition from my Powerpoints, links provided or Google
     - Choose your 8 most interesting & important tips
     - Take notes on how to use them
     - Set up a Google Slide to be book size
     - Lay out the basic template for each page
     - Shoot at least one before/after or with/without of each tip
4.  Review/what’s next


Period 5
Hi guys, happy Friday! The end of our first week of cyber school... congratulations! I don't feel like it's going too badly, I hope you feel the same way. Today we are going to continue to learn a little bit of background knowledge about graphics. We are going to start to draw on the computer next week. Before we embark on that journey I would like you all to know a little bit of background knowledge about images and how they show up on screen.

The first thing that I would like you to do is watch this video on pixels and screens. It's really well done and does a great job of describing how your screen, whether a phone, tv or tablet, shows images. After watching that video, take a look at this one. In it I discuss some common vocabulary for images and give you a little more background on how pixels and resolution come together. Since it's Friday, and it's been a crazy week already, we'll call it a day once you have watched this videos. I won't even have you do any assignment to go with it for today. I'm trusting that you will do the right thing and watch these two videos, you're on the honor code! Hope you have a great weekend everyone!
0 Comments

Thursday, April 2nd

4/2/2020

0 Comments

 
Period 1
Good morning, hope you're getting along well today. I have to tell you, I have really enjoyed watching the videos that you all have made and posted. It makes me really miss school even more. I know that makes me sound like that nerdy loser teacher that needs to get a life! It has been fun getting to know a little bit about you all though. If you have not yet made and posted a video, please do so ASAP. Don't forget to reply with thoughtful responses to at lest 5 other videos.

Today we are going to get into some photography! I'd like to introduce one of my favorite assignments in the class. It has a lame name... the Image Merging Project. What we are going to do is Photoshop you into a picture. Now, just so you know, this isn't going to be a simple 10 minute project! There are quite a few different steps and even some background knowledge that we will have to go over. This video describes the project and will show you some examples that students have done in the past.

Before we get started on the project, let's get a little background on how screens show images. Take a look at this short video. It's short but it not only explains but shows you how a screen shows pictures with pixels. This is the heart of digital images and understanding this is crucial.

Today we'll focus on coming up with an idea for you and finding an appropriate picture. This video will get you started with finding an image. One thing that I want you to know is that saving the image will be just a little different than that video since we are on Chromebooks. Stop watching that video around the 5:20 mark. This video will cover saving on a Chromebook.  Watch the video and find an image that will work for you for this project. Once you've found and saved the image, you are done for the day!

What are we learning today?
1.  Our First Project... Image Merging
2.  Examples
3.  Background About Digital Images
4.  Finding an Image
5.  Objectives to accomplish today:  
   Checking in
     - Please answer the checking in question
   Getting to Know You Video
     - Watch the How to video
     - Jot down a few notes on what you would like to say
     - Launch your camera and record your video
     - Video should answer:
          - Who you are, grade
          - Something you like to watch, listen to, read or play
          - Someone famous that you would like to be and why
          - One thing that your proud of yourself for achieving
     - The video should be at least a minute long
     - Don’t worry if someone walks into the shot, noise in background etc
     - Just be you!
     - Save the video and upload it to Schoology
     - View the videos of your classmates
     - Reply to at least 5 of your classmates
   Image Merging
     - Come up with an idea for your project
     - Find an appropriate image on Google
          - The higher the resolution the better
          - Make sure there is adequate space for you to occupy
          - The image must be school apprpriate!
     - Download the image so that you have it to use later.
6.  Review/what’s next


Period 4
Hi everyone, hope you are having a good day. Today we will get started with making a photography tips book. This will be a little different because, like everything else it the class, it would have used Adobe Creative Cloud software. Instead, since we are using Chromebooks, we'll use Google Slides. I like to use this over Docs because it is so easy to re-arrange things and position precisely. This video will show you how to get started. All you need to accomplish for today is laying out the page elements (text boxes, page numbers, photo boxes, background design, etc.) for the pages of the book and copy the slide so that you have 9 pages. The first will be a cover so you can delete the design off of it. That's it for today! Let's make it a good day!

What are we learning today?
1.  Introduction to the Tips Book Project
2.  Video: Setting Up a Google Slide Doc
3.  Objectives to accomplish today:
   Checking in
     - Please answer the checking in question
   Composition Assignment
     - Research composition from my Powerpoints, links provided or Google
     - Choose your 8 most interesting & important tips
     - Take notes on how to use them
     - Set up a Google Slide to be book size
     - Lay out the basic template for each page
4.  Review/what’s next


Period 5
Good afternoon, hope your getting along well today. I have to tell you, I have really enjoyed watching the videos that you all have made and posted. It makes me really miss school even more. I know that makes me sound like that nerdy loser teacher that needs to get a life! It has been fun getting to know a little bit about you all though. If you have not yet made and posted a video, please do so ASAP. Don't forget to reply with thoughtful responses to at lest 5 other videos.

I'd like to take today to explain how Graphics class is different from Art classes and what a few of the careers that the class will expose you to. This video will explain these things. After watching the video I'd like you to go onto Schoology and answer a brief question. That's all for today, take care and be safe!

What are we learning today?
1.  Video: What is Graphics
2.  Simple Question
3.  Objectives to accomplish today:  
   Checking in
     - Please answer the checking in question
   Getting to Know You Video
     - Watch the How to video
     - Jot down a few notes on what you would like to say
     - Launch your camera and record your video
     - Video should answer:
          - Who you are, grade
          - Something you like to watch, listen to, read or play
          - Someone famous that you would like to be and why
          - One thing that your proud of yourself for achieving
     - The video should be at least a minute long
     - Don’t worry if someone walks into the shot, noise in background etc
     - Just be you!
     - Save the video and upload it to Schoology
   What is Graphics
     - Watch the video
     - Go onto Schoology & complete the assignment
4.  Review/what’s next
0 Comments
<<Previous
Forward>>

    Cycle Day

             6        

    Today's Schedule

    Period 2         8:55
    Homeroom   9:24
    Flex/AP          9:59
    Period 3      11:24
    Period 5         1:15

    Period 3         2:35

    Archives

    March 2023
    February 2023
    January 2023
    December 2022
    November 2022
    October 2022
    September 2022
    August 2022
    July 2022
    June 2022
    May 2022
    April 2022
    March 2022
    February 2022
    January 2022
    December 2021
    November 2021
    October 2021
    September 2021
    August 2021
    June 2021
    May 2021
    April 2021
    March 2021
    February 2021
    January 2021
    December 2020
    November 2020
    October 2020
    September 2020
    August 2020
    June 2020
    May 2020
    April 2020
    March 2020
    February 2020
    January 2020
    December 2019
    November 2019
    October 2019
    September 2019
    August 2019
    June 2019
    May 2019
    April 2019
    March 2019
    February 2019
    January 2019
    December 2018
    November 2018
    October 2018
    September 2018
    August 2018
    June 2018
    May 2018
    April 2018
    March 2018
    February 2018
    January 2018
    December 2017
    November 2017

    RSS Feed

Powered by Create your own unique website with customizable templates.